Lots of hard work goes into creating your CE-sponsored events: picking a topic, drafting an outline, getting content approved for CE, finding a panel to speak on the subject, etc. So why is it, after all that work, that getting your audience to register and attend seems like half the battle, if not more?
The importance of a perfectly-curated email invitation is a factor that can often go overlooked or not be focused on enough. Whether your wholesalers are using a pre-formatted template or simply sending a 1-1 email to their top clients/prospects, there are a few must-haves that every invitation should include. Read along as we share some tried-and-tested tips that you can hopefully put to good use the next time you advertise your CE event!

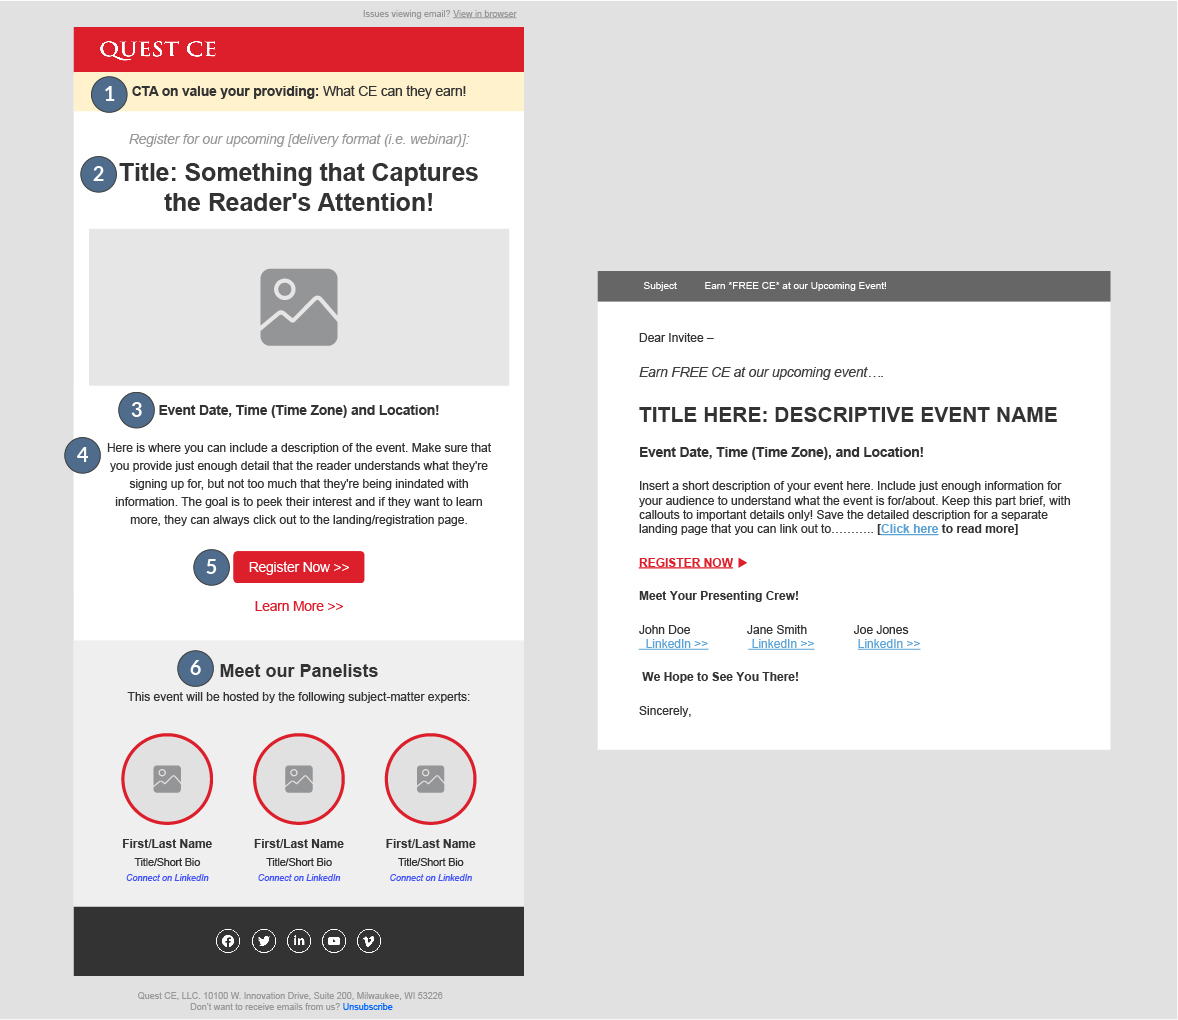
1. Preliminary Call-to-Action. Make sure your audience knows exactly what it is that you’re advertising. Are you announcing a webinar? Hosting a lunch-in? Or simply offering on-demand CE? Reel in your audience’s attention with an enticing call-to-action that gives a sneak peek of what the rest of your email entails. If your event is an opportunity for CE credit, tell people precisely what credits you’re offering and where it’s approved.
Ex. “Earn CFP ethics credit…” OR “Approved for 1-credit of CE is every state (except NY) …”
2. Header/Title. Following your first call-to-action should be your event title/header. Make it big and flashy to stand out against the rest of the invitation. Keep the title of your event short and to the point with just enough information that encapsulates the topic. Titles with numbers or action words are great for sticking out and leaving your audience wanting to know more.
Ex. “10 Common Life Insurance Planning Mistakes”
3. When + Where + How. While it seems like a no-brainer, having a dedicated spot in your invite that describes when, where, and how your event is happening is essential! Keep it separate from the body of the email so your audience can easily pick these details out.
4. Brief Event Description. To further attract your audience, provide a few lines that give a high-level overview of the event. The description should be brief and only pull out the key discussion points. This shouldn’t be where you dump all of the information regarding your event — save that for a landing page!
5. Secondary Call to Action. After the brief description is when you should put your secondary call to action. For example, if you’re hosting a webinar, the link to “Register Now” should go here. Like the header/title, you want this to also stand out. Make it bolded, put it in a box, and use a different colored font than the rest of the email to really set it apart. Additionally, you can put a link to a landing page to “Learn More” here.
6. Featured Guests/Event Representatives. Is your event featuring a subject-matter expert to give advice? Let your audience know who will be leading your event with a section that introduces your panelists, remembering to leave the major details for your designated landing page. Linking your guest speaker’s LinkedIn profiles is a great way to give your audience an opportunity to scope out the panel on their own (and forge some new connections!).
As you can see, the path to a successful email invite is simple. Feel free to play around with the layout and find what works best for your invite. And remember — your invite doesn’t have to be fancy! These guidelines work for a simple written email as well (see image).


